3D PRINTING MATERIALS, TERMINOLOGY AND SPECIFICATIONS
3D printing can seem daunting to many people as the technology is demonstrated on the news to create all sorts of weird and wonderful products, even human tissue. For the average person though, there are 6 main aspects that you should be aware of when 3D printing. These are terms we will discuss with you as variables to alter quotes and will help you understand exactly what you need from the printer.
1) Plastic types
There are three main plastic types used in small-scale plastic 3D printing, Polylactic Acid (PLA), Polyethylene Terephthalate-Glycol (PETG) and Acrylonitrile Styrene Acrylate. There are three other, rarely used plastics for very specific applications in carbon-fibre infused PLA/PETG/Nylon, Polycarbonate and Polymakers custom PLA blend ‘Polymax”. These are all thermoplastics, able to be heated, molded and cooled rather easily and safely, hence their popularity in 3D printing. Each plastic has its advantages and disadvantages, for any job we will advise on which option suits your needs best. We are always looking into new experimental filaments so this list will continue to grow.
- Our plastic of choice that we print most of our jobs in is PLA. This plastic is easy to use, fast to print from, affordable and comes in a huge range of colours. PLA is quite strong when 3D printed with a high layer bonding strength between layers, but has a brittle failure method where it will snap instead of bend. PLA has the notable advantage of handling large prints very well due to its ability to hold its shape while cooling. PLA’s main disadvantage is that it is susceptible to UV damage and deform under loads when the plastic begins to soften above 45°C. Prints in PLA should not be left out in the sun or in a car on a hot day or used in any application where ambient temperatures exceed 45°C. PLA is perfectly well suited for fitment test engineering prototypes, props, architectural models and generic plastic components to help around the house.
- The second most common 3D printed plastic we use is ASA. ASA is a derivative of ABS which is commonly used in car parts and is known to have fairly high environmental resistance, flexibility, ductility and impact resistance. ASA has all of these advantages with additional UV stability and less susceptibility to warping. It is suitable for all prints which are exposed to the elements where PLA is not appropriate. ASA is typically only available in black, white and grey. Custom colours can be ordered in at the cost of a new roll.
- The third most common 3D printed plastic we use is PETG, known for having good characteristics in almost all possible 3D printing metrics with the added ability of being highly safe and suitable for aquatic and laboratory environments. With a higher temperature resistance and strength than PLA, it will generally outperform it in all applications and comes in a wide range of colours including many translucent shades, however it does have drawbacks in significantly worse surface finish on parts which require supports (covered below in this guide). We always stock black PETG but can custom order in any colour, done at the cost of a new roll.
- Polymax filament is a proprietary derivative of PLA which exhibits extremely strong mechanical properties for 3D printed parts, outperforming PLA, ABS and PETG by a significant margin while being rather easy to print from like normal PLA with a brilliant surface finish and can handle large parts . Polymax however does retain the same susceptibility to warping in high ambient temperatures under load and is considerably more expensive than the three common plastics.
- Carbon Fibre Nylon and Polycarbonate are specialised industrial-strength plastics which all feature even higher strength than Polymax while maintaining UV stability. However, these plastics do not handle large or flat prints well at all and are very limited in size (typically 200mm or less), are expensive, have limited shelf life and limited colours. The applications for these plastics are very rare, since if we need maximum environmental resistance and strength, I will always recommend printing in industrial grade resin, laser sintered powder or metal via our supplier network.
In summary;
PLA is suitable for any job that does not require heat resistance or is used outdoors.
PETG is suitable for any job that needs higher strength than PLA ans is not used outdoors.
ASA is suitable for any job that is used outdoors, regardless of strength requirements.
Polymax is used for any job that requires maximum strength and is not used outdoors.
We can supply industrial-grade, maximum quality SLA resin, SLS, Polyjet and metal 3D prints. This particular service is completely unique and separate from plastic extrusion printing, thus the following guide does not apply.
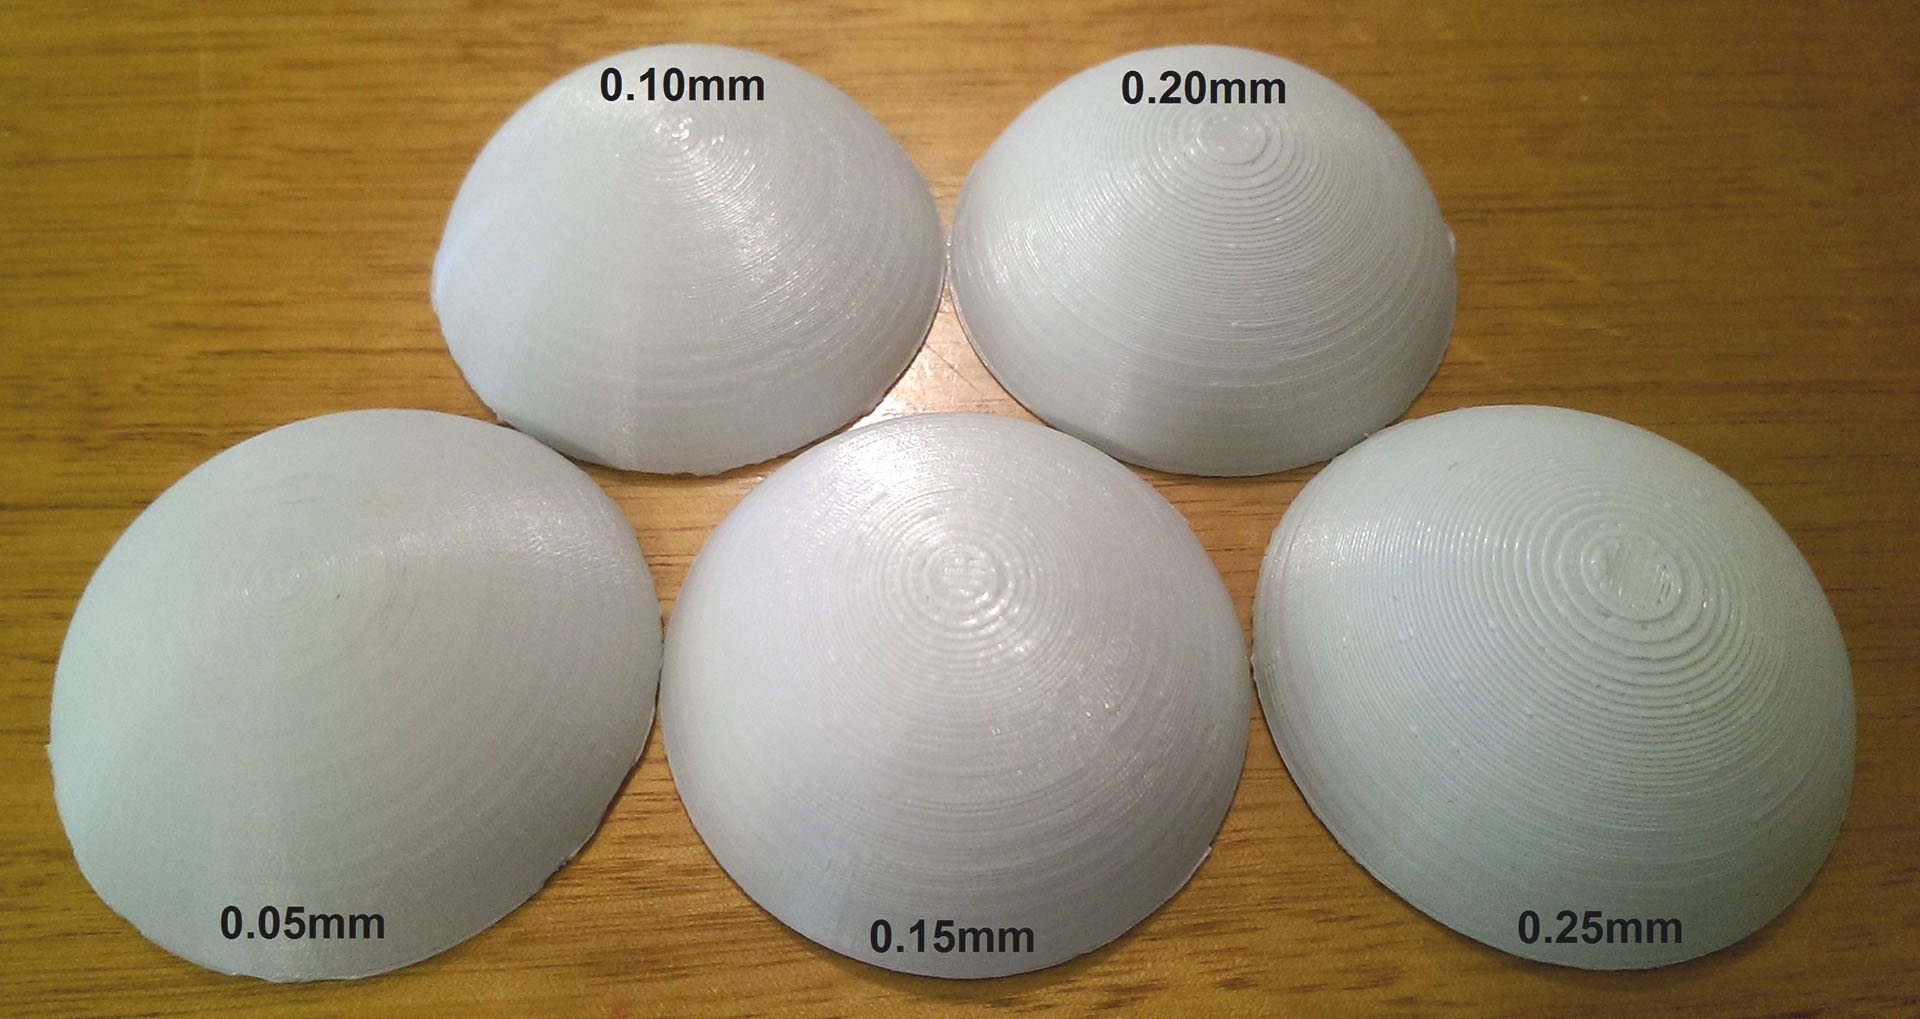
2) Layer Height
3D printers make their parts by putting down thin layers of plastic to build the part by sheets. Each of these sheets can vary in size dramatically depending on which type of machine made the part. Layer height is the simplest way to control the cost of a part and its surface finish. A thinner layer will give a smoother result, but takes longer. Most commercial plastic 3D printers vary in capability between 0.1mm and 0.3mm thick layers of which we are capable although a print with a layer height of only 0.05mm has been achieved. By standard we print at 0.20mm-0.25mm height. The strength of layer bonding in 3D prints is relative to layer height, with thicker heights producing stronger prints, so any print which needs high strength I will always print in thicker layers. Prints in 0.3mm are the most affordable while prints down to 0.05mm will be more costly due to the time they take to print.
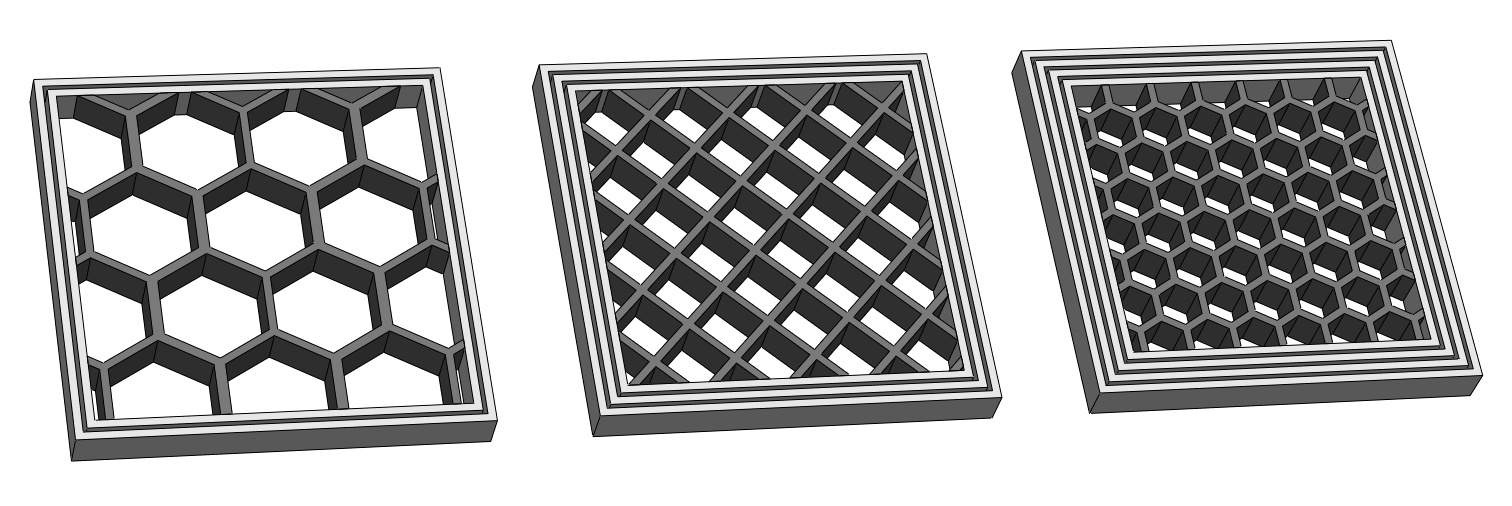
3) Infil % and wall thickness
3D printers draw shapes by first drawing the outline as a ‘wall’ and then filling in the ‘floor’ with a solid sheet of plastic. After this, they then fill in the inside of the part with a honeycomb or square mesh. This allows the process to be very fast and holds the shape well. The higher the infill, the stronger the part. By default, we print at 10% infill for props, 15% infill for prototypes and architecture and 20% for end-use parts. Walls are typically required to be a minimum of 1.6mm thick which involves 2 walls drawn on the inside and outside of the shape at 0.4mm thick each. By standard we do 2 walls for props (1.6mm thick) and 3 for prototypes (2.4mm thick).
We can increase the infill % and wall thickness as required for prints to make them stronger however this does increase the printing time and material costs. I will always advise on what settings are best for your application to give the strength you need at the lowest price point.
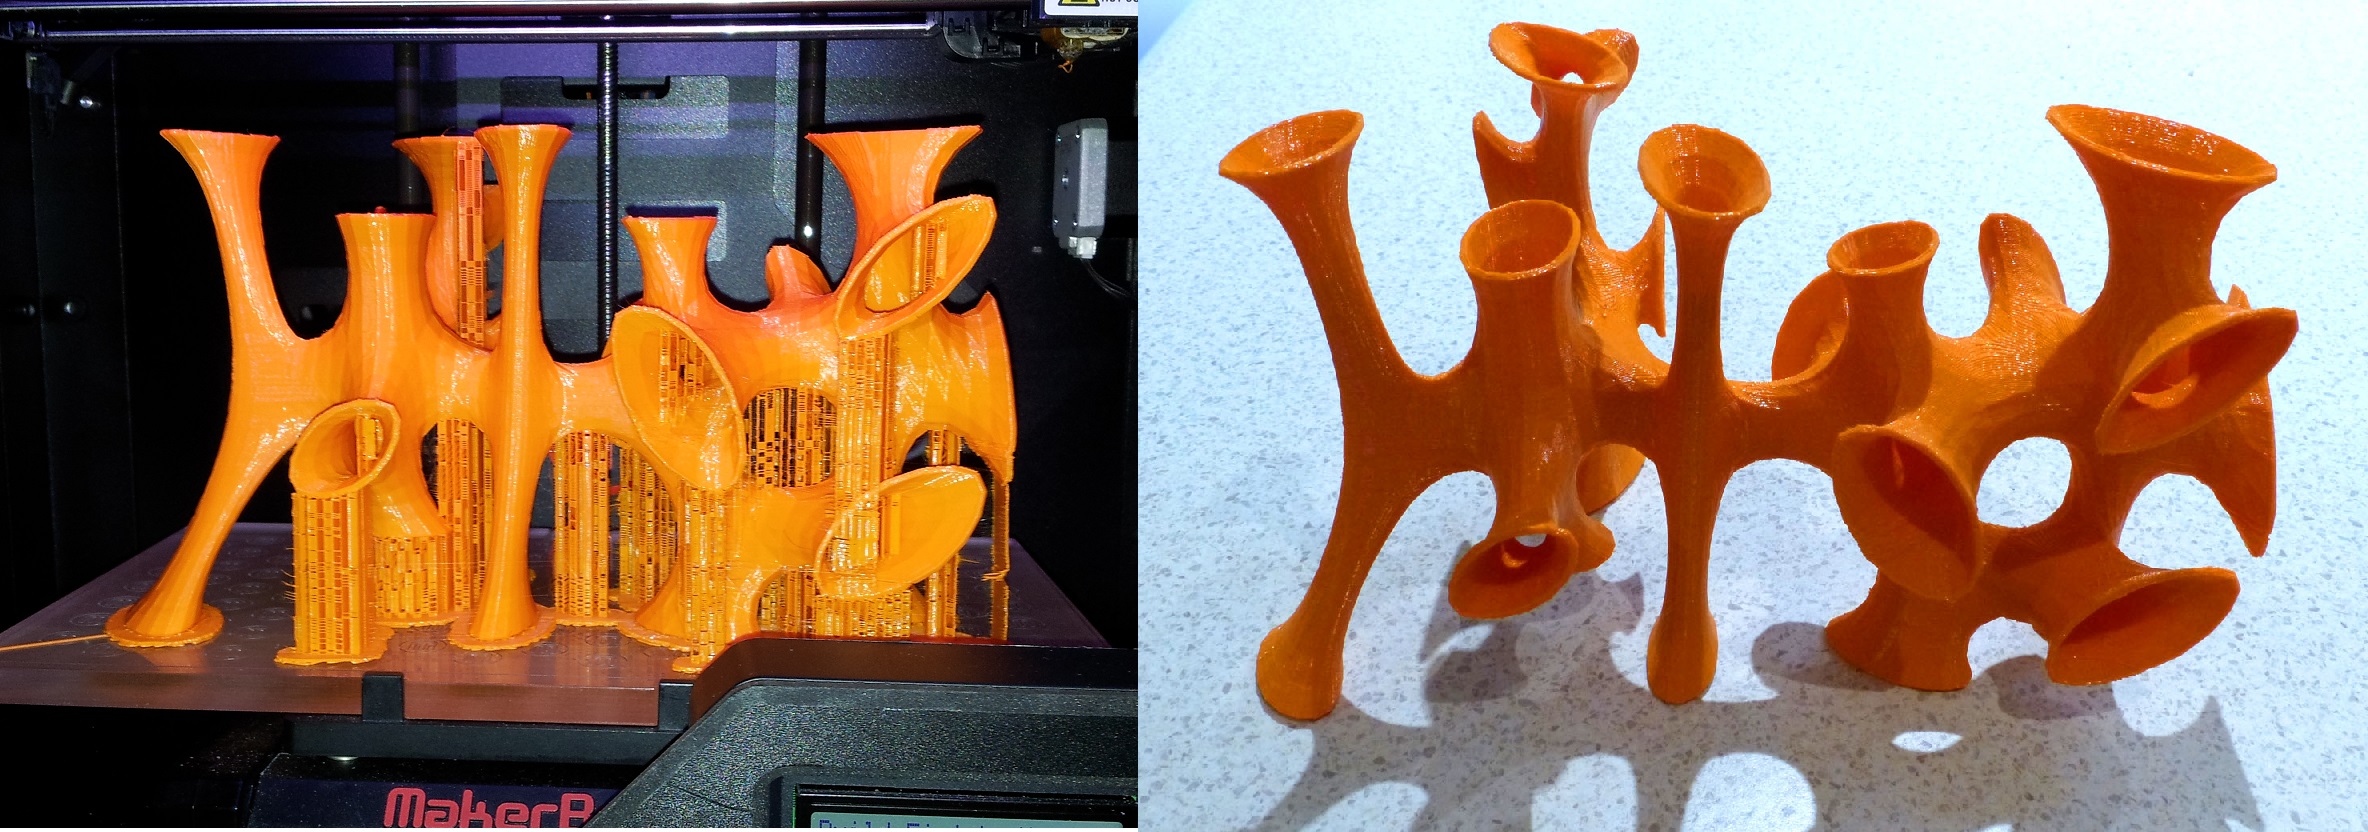
4) Supports
Since plastic 3D printers operate by putting down layers of plastic on top of each other, when it comes to overhanging structures (such as the eaves on a miniature house), the printer is required to build ‘support’ structures underneath. These are basically like scaffolding as thin, low density lines purely to hold up the overhang. After a print, these supports are removable with pliers and then the point of contact is filed and sanded down for as smooth as possible a finish. Our printers can handle overhangs as low as 10* without needing any support structure which means we can handle some very complicated pieces without supports for a perfect finish however near perpendicular features that jut out from the main structure, will need some cleaning up afterwards. I personally do this for free.
5) Tolerances and minimum feature size
Our 3D printers have a standard nozzle diameter of 0.4mm which common among all 3D printers. This means that each and every line of plastic drawn out to create an outline is 0.4mm thick. For ultra-fine detail of surfaces, this represents our absolute minimum feature size. While we can print at layers of 0.05mm, if we were to print for example embossed lettering, the thickness of each line that forms the individual letters must be 0.4mm for in order to print however 0.8mm is the recommended minimum for embossed text. This is usually never an issue however for ultra-fine detail, that is the limit.
With tolerances, the printer typically has an accuracy of +/- 0.2mm. This tolerance is a factor of the plastic cooling and expanding slightly along the walls of parts, resulting in solid sections tending towards the +0.2mm tolerance while holes tend towards the -0.2mm tolerance. Tolerances do not build up over the length of a piece. It is critical to understand that these tolerances result in overall a +0.4mm for any interference or tolerance fits. For a 10mm rod to fit into a 10mm hole, they must be altered to 9.8mm for the rod and 10.2mm for the hole in order to print with a tolerance fit.

When printing with ASA, this introduces the additional factor of shrinkage. ASA prints will typically hold their dimensions very accurately until around 80mm after which parts will begin to suffer shrinkage as they cool down. This is typically in the range of 0-1.5% such that an ABS print 200mm long, could end up printing 198mm long. There are many factors that determine how much shrinkage an ASA print will suffer and certain geometries will hardly shrink at all. This can and will affect the tolerances, any large prints are always recommended to be done in PLA as they have very minimal shrinkage.
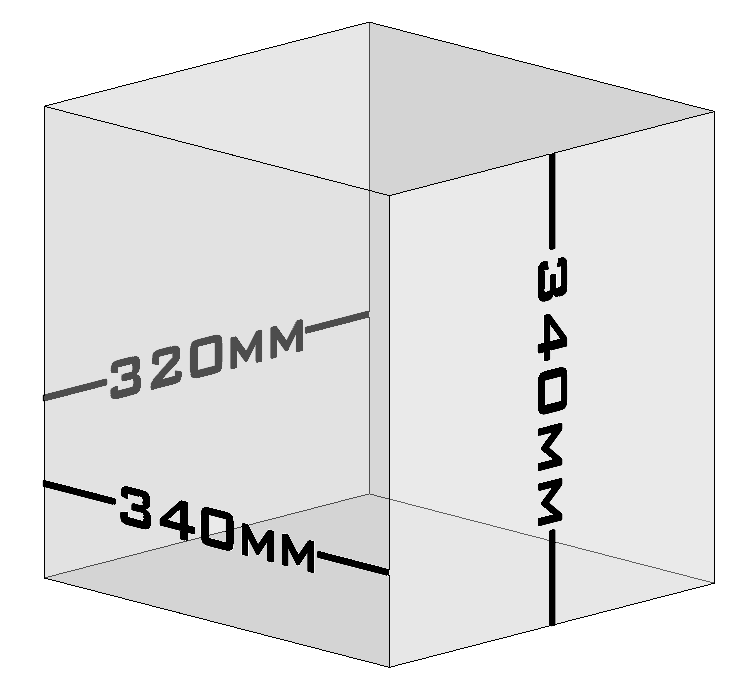
6) Build volume
3D printers vary in size greatly, however most printers on the market including industrial sized printers can print objects around the size of a human head or a loaf of bread, printers have different dimensions in different directions. The largest printer I operate has a build volume of 340x320x340mm and I have several other slightly smaller machines used for smaller jobs.
Models required to be printed that exceed this size can easily be built by parts which is a practice we routinely use to create oversized props and models. Many of the props I work with are built via parts, with many examples available here and we often do the same with large architecture models.
All information and images contained in this guide are original content of 3D Prototypes and Models and must not be re-created without direct reference to this web page.